User Manual
Quickstart
To be able to usesongs, you first have to import and configure audio files in your iPad.
To try out, you can download 3 free demo songs, which are then shown in the "Song Configuration" view. To do this, please perform the following steps:
- Please tap the Settings button at the bottom of the screen
- then tap „Demo Songs“ on the left side
- And finally on „Download Demo Songs“
After all songs are downloaded, tap "Song Configuration". The Demo Files folder is displayed in the Audio Files menu
- tap „Demo Songs“
- tap on a Song of your Choice
Now you can see the individual audio files belonging to the song.
- Tap every audiofile -> in the right window the channel strips of the respective audiofiles appear.
Next, assign an audio channel to each track. If no USB audio interface is connected, only the two speakers / headphone outputs appear.
- Tap one of the green "Out" buttons of an audio file. A window with the available audio outputs opens
- Tap one or more audio outputs / outputs you want to assign to the audio file.
- Tap "Done" or into an area outside the Output window to close it.
- Repeat the channel assignment for each channel
Now you can change the volume of the individual channels and then save the song.
- Tap the Start button to start the song
- Adjust the faders to your liking
- You can forward / rewind the song using the position control
- When you are finished, tap "Save" in the upper right window.
The song is now ready and can be used in playlists.
Repeat these steps for all songs you want to use.
Now you can create a playlist:
- Tap Playlist View in the lower TabBar menu
- Tap the songs in the left window that you want to transfer to the playlist
- If necessary, you can rearrange the Playlist by tapping Edit above the Playlist window and drag the songs to the desired location.
- Save the playlist by pressing the Save button on the upper right (optional)
- press start
If you notice during live operation that the one or the other track is too soft or noisy, you can adjust it in the left window and press "Quicksave". Then the song will be overwritten immediately with these settings.
If the buttons are too small, switch to the Live View by tapping "Live View" in the lower tab bar.
How do I copy my own audio files to the iPad?
There are several methods to copy audio/midi files into Multitracker. You can transfer them from your Mac/Pc using iTunes, you can import files from cloud services like Dropbox or iCloud by using the Filemanager in Multitracker, or you can transfer files from other iPad Apps which support file sharing by tapping the file sharing icon.
- using iTunes:
To copy your audio files from Mac/PC to your iPad, first connect your iPad to the Mac / PC. If iTunes does not open automatically, open iTunes manually.
Follow the steps below:

- Click on the iPad icon
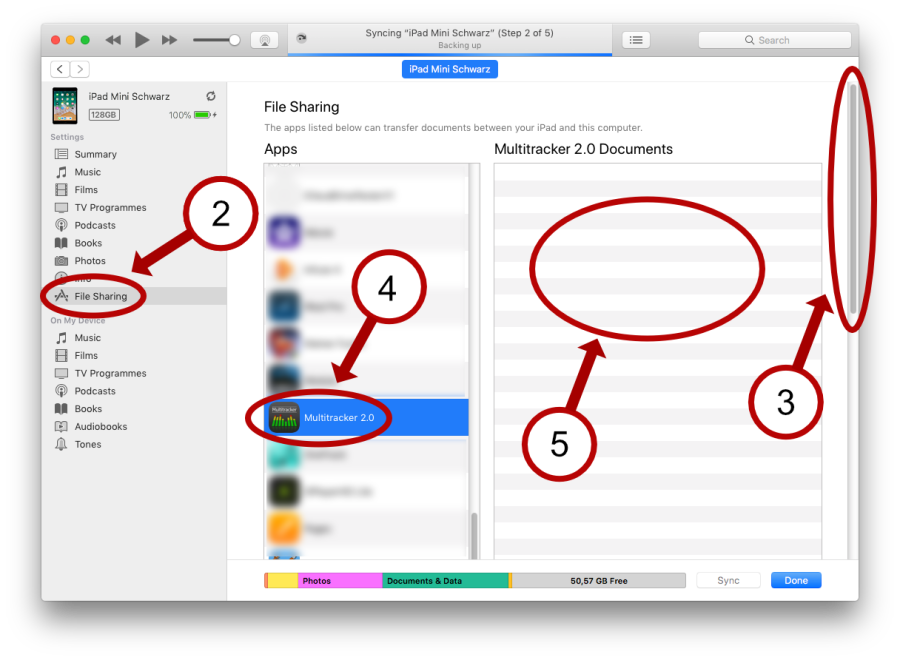
2. Click "File Sharing" to access your installed apps
3. Scroll down the screen until the "Multitracker" icon appears
4. Click the "Multitracker" icon
5. drag and drop your audio files into the Document window
-or-
click "Add" at the bottom of the Multitracker Documents window